Pimp your Homelab - Giving an old Office PC a second life as a Home Server
Introduction
I had this computer lying around for the last couple of years. Before that, it was my main PC.
There's nothing interesting about it (especially by 2026 standards), it's not a workstation worth upgrading, it's not really that fast either.
It's an old HP Compaq 6200 Pro MT.
| The Victim in question | Inside |
|---|---|
| Component | Specification |
|---|---|
| Model | HP Compaq 6200 Pro MT |
| CPU | Intel Core i5-2400 |
| CPU Cores | 4 |
| Memory | 8 GB DDR3 (2x2GB RAM + 1x4GB RAM) |
| Storage | 750 GB Hitachi HGST 5400 RPM HDD |
| Network | Gigabit Ethernet |
| Operating System | Ubuntu Server 26.04.1 LTS |
| Container Runtime | Docker |
| LAN Address | 192.168.1.106 |
| Remote Network | Tailscale |
Why bother with hardware this old?
There is a tendency to treat "old" computers as "useless" and throw them away because they no longer meet the expectations of their original job. In my HUMBLE OPINION, AT THE VERY LEAST clean them up, set them up and give them to students/families who can't afford one. It costs you nothing.
An old desktop like this might no longer be a particularly good gaming computer or daily workstation but it's still better than letting it be e-waste. 8 GB is enough memory for lightweight Linux services, and a 750 GB hard drive is slow compared with an NVMe SSD, but it still holds hundreds of gigabytes of data.
I'm honestly treating this as an experiment for a future proper full-scale homelab server. My primary goals are to enhance my Linux system administration, SSH workflows, networking fundamentals, and Docker containerization. I'm also replacing third-party cloud services with open-source alternatives which honestly is the best trade anybody could wish for.
Starting with Ubuntu Server
I installed Ubuntu Server 26.04.1 LTS and run the machine headlessly.
There is no desktop environment sitting there consuming resources. Most administration happens through SSH from my laptop/home PC. The machine is named
homelaband its local network address is:
192.168.1.106For remote access, the server runs Tailscale.
Its Tailscale address is:
wouldntyouwannaknowweatherboyThe system disk uses encrypted storage with LVM and ext4 root filesystem.
I wanted my server to have a "correct structure" and not have application data scattered everywhere. My basic directory layout became:
/srv/
├── homelab/
│   └── stacks/
├── appdata/
└── media//srv/homelab/stacks- contains Docker Compose definitions./srv/appdata- contains persistent application data./srv/media- contains media (movies/shows/cartoons/etc).
That gives me a clear mental separation between configuration, application state and media/data rather than ending up with twenty unrelated directories inside my home folder.
A simplified version looks like:
/srv/homelab/stacks/
├── dashboard/
├── finance/
├── media/
├── monitoring/
├── proxy/
├── scrutiny/
├── tools/
└── ...
Why Docker instead of Proxmox?
This was probably the biggest architectural decision.
Proxmox is extremely attractive for a homelab. Virtual machines, LXC containers, snapshots, web management, isolated environments, virtual networking, templates, clustering. It's exactly the kind of thing that a nutjob dreams of. I seriously considered it but the problem was the hardware... ehem 8 GB RAM... meaning I would spend a meaningful portion of the available memory just running several copies of Linux.
For this machine, Ubuntu Server + Docker Compose was the simpler and more efficient answer.
Docker gives me:
- service isolation
- straightforward upgrades
- independent application lifecycles
- separate Docker networks
- bind-mounted persistent data
- low overhead
without running a full guest OS for every application. So Docker made more sense to me.
What the homelab looks like now
Homarr - one page for the whole lab
As you can see from the dashboard, once you have more than a few services, remembering ports becomes annoying very quickly. I use Homarr as the front page for the homelab. So instead of remembering every URL, I can open the dashboard and jump directly to the service I want. It's beautiful, and you can add a lot of integrations to it with ease.
Homarr itself is not directly published on a normal host port in my current setup. Instead, it lives on a Docker network called proxy and listens internally on 7575.
Caddy sits in front of it. A simplified Compose definition looks like this:
services:
  homarr:
    image: ghcr.io/homarr-labs/homarr:latest
    container_name: homarr
    restart: unless-stopped
    environment:
      - SECRET_ENCRYPTION_KEY=${SECRET_ENCRYPTION_KEY}
    volumes:
      - /srv/appdata/homarr:/appdata
    networks:
      - proxy

networks:
  proxy:
    external: true
Homarr doesn't need to expose its own port directly to every interface on the host. Caddy can talk to it internally.
Caddy - a simple entry point
Caddy currently acts as the reverse proxy for Homarr. The configuration is intentionally tiny:
:80 {
    reverse_proxy homarr:7575
}
Caddy and Homarr share the same Docker network, which means Homarr can be resolved by container name. The proxy stack publishes:
host :80and sends the request internally to:
homarr:7575So instead of opening http://192.168.1.106:7575 I can simply use http://192.168.1.106.
One small thing I learned here was the difference between a port being exposed by an image and a port actually being published on the host.
At one point Caddy had host port 443 published too but I later removed that because I currently need the HTTP listener.
Docker networks instead of one giant flat network
Another thing I wanted to avoid was attaching every service to one huge shared Docker network. Some of the networks created by the stacks include:
proxy
finance_default
monitoring_default
tools_default
This gives each logical group of services some separation. Of course, this isn't a replacement for a firewall or proper security controls, but it's cleaner than letting every container communicate directly with every other container for no reason.
Services
Uptime Kuma
I wanted the simplest possible monitoring service, Uptime Kuma. It's very simple to set up, simple to use and it does its job pretty well. If a service goes down, Uptime Kuma alerts me via Telegram.
Beszel - lightweight system monitoring
Of course, I wanted system monitoring too, but I did not want to dedicate a huge amount of RAM to a large observability stack. I discovered Beszel.
Beszel runs at 192.168.1.106:8090 with a separate Beszel Agent monitoring the host.
The agent uses host networking because it needs visibility into the system itself. This gives me a quick way to inspect things such as:
- CPU usage
- Memory usage
- Disk usage
- Load
- System health
- Container activity
Dozzle - Docker logs without living in SSH
Docker logs are one of the first places everybody looks when something breaks. The traditional approach works perfectly well but sometimes constantly SSHing into the server and switching between container logs can get very annoying.
So I added Dozzle. It's available on 192.168.1.106:8082 and gives me a browser interface for container logs.
Scrutiny - because the entire server currently depends on one old HDD
One of the things I currently hate about the build is also one of the most important. The machine currently uses a single 750 GB Hitachi/HGST 5400 RPM hard drive.
I wanted visibility into its SMART data, so I installed Scrutiny.
The web interface is available at: 192.168.1.106:8085. Whether you use this or just check the disk manually via terminal is up to you. Proper backups are what need to be added in the future, it's just not a priority as of right now (famous last words).
Actual Budget - genuinely useful
Not every service needs to exist because it's technically interesting. Some should simply be useful. I run Actual Budget at 192.168.1.106:5006.
What is it? Manage your budget... that's it. Pretty naive to have this on when you can put everything in an Excel Spreadsheet or a notebook but still useful.
Excalidraw
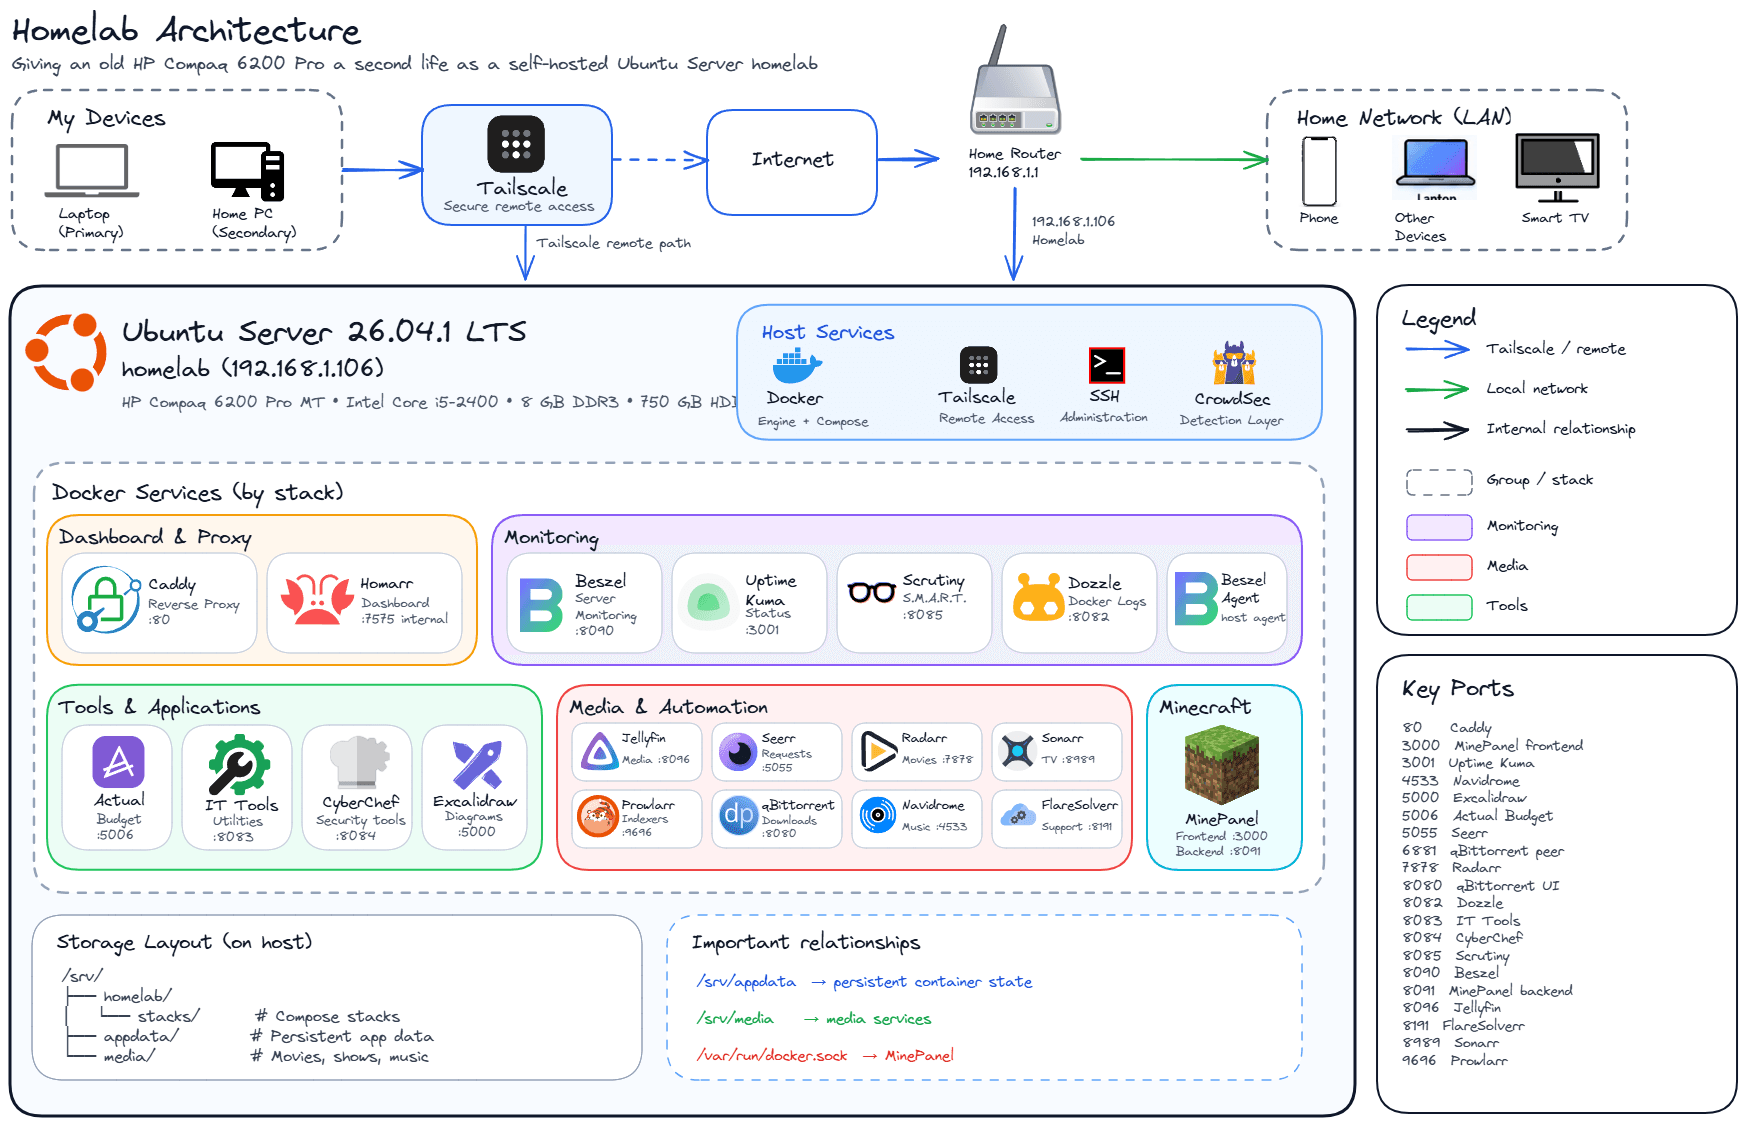
I honestly love this tool. On every app that I work on, I use this to show the project architecture, how everything works. Even the diagram in this article was created using Excalidraw.
I run this instance under 192.168.1.106:5000
IT-Tools and CyberChef
| IT-Tools | CyberChef |
|---|---|
They are very useful and give me a lot of utilities in one interface. They run on 192.168.1.106:8083 and 192.168.1.106:8084.
Jellyfin (+ Seerr, Radarr, Sonarr, Prowlarr, FlareSolverr & qBittorrent) - turning the server into a media server
OK, I'll be honest, whenever people say the word "homelab" they immediately associate it with Jellyfin (or its alternatives).
I'll agree, it's the most interesting & exciting part of the homelab but it's very draining to set up as a first-timer and by that I don't mean the actual installation process, I thought Jellyfin did all the heavy lifting - download and watch movies, etc.
Oh no...
Turns out you need Seerr to discover and request movies, Radarr to manage and automate movies, Sonarr to do the same for TV shows, Prowlarr to manage the indexers, qBittorrent to ACTUALLY handle downloading... a lot of figuring out.
I slapped a Netflix-looking theme on Jellyfin called SleekFin and installed the Jellyfin Enhanced plugin so regular users won't have to go to Seerr to request movies.
TLDR:
- Prowlarr gives me one place to manage indexers instead of configuring the same sources separately for every application.
- Sonarr handles TV-series organization and automation.
- Radarr does the equivalent job for movies.
- Seerr provides the request/discovery interface.
- FlareSolverr exists as a supporting service for situations where another application needs it.
qBittorrent - download client
qBittorrent is the download client that I use. The Web UI is bound to 192.168.1.106:8080 and its peer port is 6881 TCP/UDP and that peer port is currently published on all host interfaces.
Navidrome - music without needing the whole media server interface
For music specifically, I use Navidrome. It runs at 192.168.1.106:4533.
Jellyfin can handle music too, don't get me wrong, but eh, I don't like it there. I like the idea of having a dedicated music server.
I can either access the site on whatever device to listen to the music or I can download Navidrome clients for iOS & Android.
Minepanel and Minecraft
My friends and I always get that 2 week Minecraft phase. I didn't want a game panel to host all my game servers because I'll dockerize those but Minecraft itself I didn't want dockerized, just personal preference so I use Minepanel
Its interfaces are currently bound to:
192.168.1.106:3000 # frontend
192.168.1.106:8091 # backend
Minepanel is different from many of the other containers because it has access to:
/var/run/docker.sockThis deserves attention. The Docker socket is effectively a very powerful control interface to the Docker daemon.
Giving an application access to it is very different from simply giving a container access to a folder.
So this is one service I consider a higher-value security target.
Tailscale - remote access without traditional port forwarding
I wanted to be able to reach the server remotely without exposing every management interface directly to the public internet or having to remote into another PC every time.
For that I use Tailscale. I'm already familiar with it, it's easy to set up, and it basically lets my devices communicate over a private network even when I'm away from home.
The server itself joins my Tailscale network, which means I can SSH into it remotely and access services that I intentionally make available that way.
I'm deliberately keeping this part simple for now. Networking and Docker exposure can get complicated very quickly, and I'd rather document what I actually understand and use than pretend I've built some enterprise-grade network setup.
Adding CrowdSec
More recently, I wanted a security layer that would fit the hardware.
I considered Wazuh. It's powerful but too demanding for this machine. So I chose CrowdSec instead.
CrowdSec is installed directly on the Ubuntu host rather than inside Docker. At the moment I am using CrowdSec primarily as a detection layer while I continue configuring it.
I deliberately did not immediately connect a firewall remediation component.
On a remote headless server, "install the security software and hope it does not lock me out" is not a particularly good deployment plan.
How I manage the stacks
One of the things I like about Docker Compose is how boring the normal management workflow becomes.
To update a stack:
cd /srv/homelab/stacks/<stack>
docker compose pull
docker compose up -d
To inspect it:
docker compose psTo look at logs:
docker compose logsor:
docker compose logs -fTo stop it:
docker compose downFor a single container:
docker logs <container>To inspect networking:
docker network ls
docker network inspect <network>
To inspect a container itself:
docker inspect <container>To see host listeners:
sudo ss -lntupThose commands probably taught me more about what the server was actually doing than any graphical management panel could have.
The architecture diagram
Once the number of services grew, I wanted something that documented the system visually. My diagram separates the system into logical zones:
The diagram also documents storage paths, Docker network boundaries, unusual exposure such as qBittorrent's peer port, and privileged relationships such as Minepanel's Docker socket access.
Six months from now, I might not remember why something is configured the way it is. Documentation is a message to your future self.
What I learned from doing this
I figured out how to properly structure my infrastructure in layers.
When I open a service in my browser, the path might involve:
browser
→ LAN
→ host interface
→ firewall
→ Docker NAT
→ Docker bridge
→ container
→ application
→ If something does not work, any one of those layers could be responsible.
→ A security setting at one layer does not necessarily override another.
→ A container can expose a port internally without publishing it.
→ A published port can be bound to a specific host address instead of every interface.
→ A service can be accessible from the LAN but not from Tailscale.
→ A router can have no manual forwards while UPnP is still active.
→ A disk can pass SMART tests while still being a single point of failure.
In my head, all of this is a real system. This thing was sitting unused for years. Now it runs all of these services, and taught me more about Linux/networking/Docker than throwing it away ever could have.
Related Posts
25/05/26 | 5 mins read
My Experience at BSides Prishtina 2026
The people, the CTF, the chaos, and why it's the best security event Kosovo has.
09/04/26 | 10 mins read
How We Found 6 Vulnerabilities in Camaleon CMS 2.9.1
What started as CTF curiosity turned into six vulnerabilities in Camaleon CMS 2.9.1
31/03/26 | 12 mins read
Breaking Into My Own IP Camera: From Unauthenticated API to Full Device Compromise
Six assigned CVEs in a Fullhan-based IP camera cover unauthenticated API access, credential disclosure, command injection, and full device compromise.